Travelport has updated all TripServices API authentication and authorization endpoints. All previous endpoints have been deprecated as of 30 Jan 2026. See Endpoint Migration below.
All Travelport TripServices APIs require authentication with OAuth 2.0. Before calling any API, you must follow an OAuth-based authorization procedure to obtain an access token. That access token is valid for 24 hours and must be sent with every call during that time. Do not request a new token for each API call.
This topic details how to obtain the access token and provides the endpoints for authentication, which must happen every 24 hours, and for authorization, which is part of every API request.
Protocol: HTTPS/1.1
Minimum TLS Version: 1.2
HTTP Method: POST (preferred, GET supported only in legacy cases)
Token Validity: 24 hours (86,400 seconds)
Token Caching: Cache and reuse tokens until expiry
Rate Limit: 50 token requests per second per unique IP address
Do not request a new token for every API call.
OAuth is an open standard that defines how access to a resource is granted to requesters. The Travelport TripServices APIs use the two-legged OAuth process for generating tokens. This means the requester provides a token and the resource returns a token. For detailed information about how an OAuth connection is established, refer to the OAuth 2.0 Authorization Framework.
You pass your client credentials to our resource and receive a token that you provide in all calls to any Travelport TripServices API. The token is valid for 24 hours. When it expires, make another call and receive another token. You can request tokens either via the language of your choice or by sending a request from the Postman collection included in the developer toolkits linked below.
Travelport provides your credentials when you are provisioned for the TripServices APIs. Travelport assigns your organization one or more usernames and access groups, based on their point(s) of sale. An access group contains information about an organization, including PCC, location, currency, NDC and GDS carrier information for the Air APIs, and printer linkages. An access group identifies to Travelport the content to which an application or user has access. Each username is assigned at least one access group and is sent in the API authentication request. The auth token returned ensures that the API responses return data that is relevant to an organization’s specific location.
When you request TripServices trial credentials, you will receive an email with the credentials you need for TripServices access:
- username
- password
- client_id
- client_secret
If you are a new TripServices customer (i.e., you have not had trial credentials):
As part of onboarding for TripServices, you will receive an email with only the client_id and client_secret. You must use MyTravelport to create primary and managed identities to get usernames and passwords.
As part of onboarding, someone in your organization is nominated as an administrator of MyTravelport and will be able to create and manage new MyTravelport users.
Log into MyTravelport.
From the Administration menu, select Manage Users.
Select the Credential Access Manager tab. Credential Access Manager is used to create and manage your TripServices credentials.
Create a primary identity in both the production and pre-production environments. Refer to the knowledge article for creating primary identities.
Primary Identities allows you to create a primary identity to connect with the TripServices APIs, rotate primary identities, disable suspected compromised primary identities, and view all PCC/access group content.
Create any managed identities you need in the environments in which you need them. Refer to the knowledge article for creating managed identities.
Managed Identities allows you to create credentials for integration with third-party applications developed using the TripServices APIs, share access to the TripServices APIs with your own collaborators and development teams, and access client credentials (client_id and client_secret headers) to allow applications to authenticate and connect with the APIs.
See the Knowledge Base article Credential Access Manager in MyTravelport for full details. See Knowledge Base Resources if you need login assistance.
Per above, a new authentication token is required every 24 hours. Do not request tokens more frequently than just under every 24 hours, and do not request a new token for every API call.
To receive a new token, send your authentication request to the following post-migration endpoint as appropriate for each environment:
Pre-production https://auth.pp.travelport.net/oauth/token
Production https://auth.travelport.net/oauth/token
Every TripServices API requires a request sent to a unique authorization endpoint. This endpoint is listed at the top of every API Reference in this online help. In addition, a consolidated list of all endpoints is provided for all Flights APIs, Stays APIs, and Pay APIs.
The beginning string of these endpoints are the same across all Flights, Stays, and Pay APIs, and is called a base path because it is shared across APIs. The following are the current, post-migration base paths for the endpoints required for every Travelport TripServices API.
Air APIs base paths:
Pre-production https://api.pp.travelport.net/11/air/
Production https://api.travelport.net/11/air/
A small number of TripServices Flights APIs do not use /air in their base path, as noted in Air Endpoints and the individual API References: Cancel Workbench Item, Document History, Document List, and Exchange Air Offer.
Stays APIs base paths, v11:
Pre-production https://api.pp.travelport.net/11/hotel/
Production https://api.travelport.net/11/hotel/
Stays APIs base paths, v12:
Pre-production https://api.pp.travelport.net/12/hotel/
Production https://api.travelport.net/12/hotel/
Pay APIs base paths:
Pre-production https://api.pp.travelport.net/11/payment/
Production https://api.travelport.net/11/payment/
In late 2025/early 2026. Travelport implemented new security and identity management standards across its products and services. As part of this initiative, Travelport updated all authentication and authorization endpoints for all TripServices APIs (listed immediately above), and provided new credentials to all customers.
All previous authentication and authorization endpoints, listed below for reference only, were deprecated 30 Jan 2026 for production and 5 Dec 2025 for pre-production. Transactions sent to the deprecated endpoints will fail.
The deprecated authentication endpoints are:
Pre-production https://oauth.pp.travelport.com/oauth/oauth20/token
Production https://oauth.travelport.com/oauth/oauth20/token
The deprecated authorization endpoint base paths for the TripServices APIs are:
Pre-production https://api.pp.travelport.com
Production https://api.travelport.com
To generate the auth token in a language of your choice, you must populate the following credentials provided when you were provisioned with the Travelport TripServices APIs:
- username
- password
- client_id
- client_secret
Send the request to the Authentication Endpoint listed above.
The following steps detail how to enter credentials and generate the OAuth token from any of the Flights Developer Toolkits.
Travelport provides the credentials required here when your company is provisioned with the TripServices Flights APIs. If you aren't yet a provisioned user, you can still browse request and response examples in the Developer Toolkits Postman collections.
- Open any of the Travelport Postman collections.
- Open the dropdown for OAuth and click OAuth. The folder and transaction name may vary between collections, but it is the first transaction in the collection.

in the Body tab at the top of the collection, enter your customer-specific credentials in the following fields:
- username
- password
- client_id
- client_secret
- Generate the OAuth token by clicking the Send button. Postman returns the access token, which consists of all text between the quotes after access_token, as shown below. This value is valid for 24 hours and automatically populates the authorization values in all transactions in the Postman collection. You can also copy this token value into your pre-production or production environments.
The following steps detail how to enter credentials and generate the OAuth token from the Hotel DevKit or Pay DevKit.
Travelport provides the credentials required here when your company is provisioned with the TripServices Stays or Pay APIs. If you aren't yet a provisioned user, you can still browse example requests in the Postman collections in the Hotel or Pay Developer Toolkits.
- Open any of the Travelport Postman collections.
- Open the dropdown for OAuth and click OAuth. The folder and transaction name may vary between collections, or it may appear standalone instead of in a folder, but it is the first transaction in the collection.
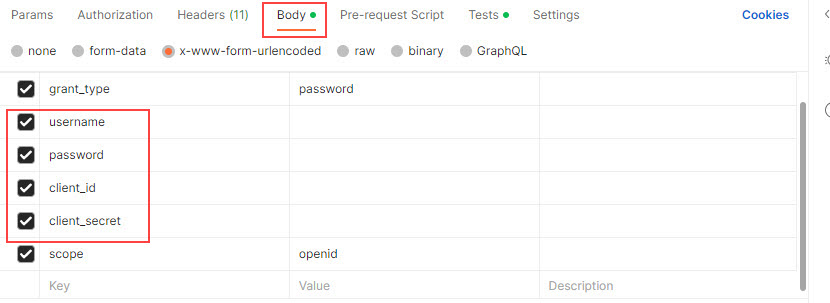
Click the Body tab at the top of the collection. Populate the following with the values provided specifically for your company at provisioning:
- username
- password
- client_id
- client_secret
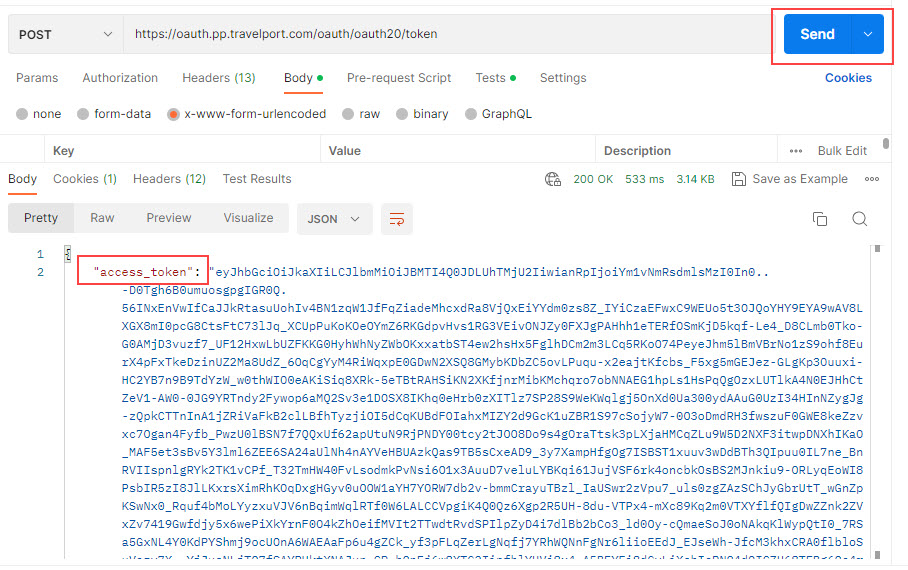
- Generate the OAuth token by clicking the Send button. Postman returns the access token, which consists of all text between the quotes after access_token. This value is valid for 24 hours.
- Copy all of the text between the quotes after access_token.
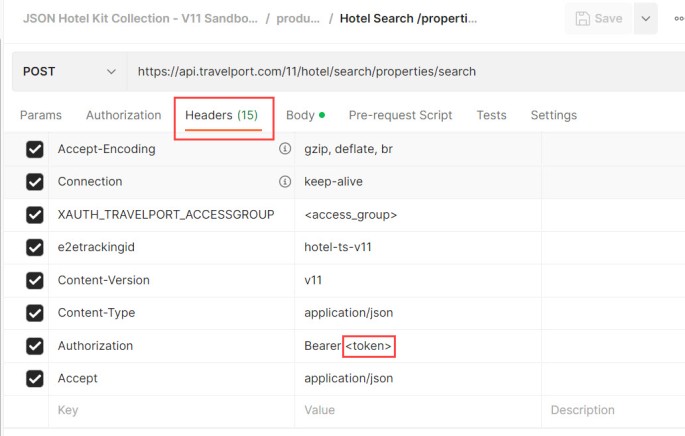
- Navigate out of the OAuth folder. In the first transaction to send, open the Headers tab at the top. In the Authorization field, after the word Bearer, replace the brackets and any existing text (such as
<token>or another token value with or without brackets) with the value copied from the OAuth transaction. After you send this transaction, the token populates into all following transactions.